©1997 Will G
Hopkins
|
|

|
How
to Use PowerPoint 4
Will
Hopkins
Use this outstanding Microsoft program to make
slides, posters, and questionnaires. The documents
are even Mac-PC interchangeable! This short article
will get you started on Versions 4 to 7 much
quicker than the manual or on-line help.
|
Last updated 26 April 1997
|
GETTING
STARTED
You wouldn't know from its name, but PowerPoint is for making
slides and transparencies. You can also use it for posters and
questionnaires.
Some conference venues now have equipment to allow you to show
PowerPoint documents directly from a computer. Saves heaps on the
cost of making 35-mm slides! You can also do clever transitions
and builds, as well as last-minute changes, which aren't
possible with real slides.
PowerPoint documents run on any platform (Mac or PC). But if you
created the document on a Mac, take it to the conference on a
PC-formatted disc (because PCs won't run Mac discs).
These instructions are for Mac and PC users. Everything is the
same, except the control key on a PC is the command key on a Mac.
These instructions will also get you started on PowerPoint 7, which
is similar to PowerPoint 4.
If you're not an experienced computer user, run the Quick
Preview program that comes bundled with PowerPoint. Otherwise
double click the Microsoft PowerPoint icon and go for it. I
suggest you keep switching between this document and PowerPoint.
CREATING A
POWERPOINT
PRESENTATION
1. Read Tip of the Day when you are more experienced. So just
click OK for now.
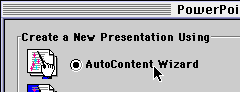
2. In the next window, choose…
…AutoContent Wizard if you want PowerPoint to help you
with the content of each slide of your talk;
…Pick a Look Wizard if you know what you want to say
on each slide but want help with the "look" of individual slides;
…Template if you want to make a slide look like a
template;
…Blank Presentation if you want to start with a blank
slide;
…Open an Existing Presentation if you want to modify
an existing presentation or use it as a template for a new
presentation.
Let's click AutoContent Wizard this time. Try the others
later:
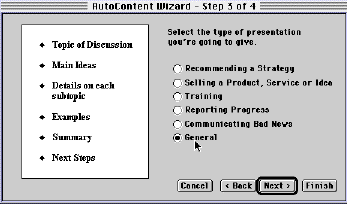
3. Let's make choices in the next few windows as if you're giving
a talk on a paper you've read. On Step 2 of 4, put a sensible
title for the talk, and your name.
4. On Step 3 of 4, choose General. Each bullet point
on the left represents a slide that PowerPoint will create for
you:
5. At this stage you'll have a window open called PowerPoint
Cue Cards. Let's take a break to look at this and the other help
you can get.
HELP
1. The first thing to notice is that when you hold the cursor over
any item on the menu bars, you get a little yellow description of it.
Great!
2. The Cue Cards can be a useful guide. You'll have to drag it out
of the way sometimes, but BEWARE: if you close it, the only way to
open it again is to create a new presentation using the AutoContent
Wizard. (This seems to be a bug.)
3. You can get help directly on a topic as follows: click on the
? (i.e. help) button at the top right of the tool
bar…
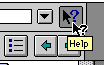
…then use the cursor (with a ?) to click on anything
in the menus or on the windows:
4. To open the general help window, hit the help key on the
keyboard.
DEVELOPING THE
PRESENTATION
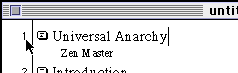
1. Back to our presentation. Right now you're in Outline View. The
words in this outline are actually already on our slides. In fact,
you can add words here, and they'll be added to the slides. Try it,
then look at your first (title) slide. You DON'T get there by
clicking on Work in Slide view towards the bottom of the
PowerPoint Cue Cards window. All that does is pace you through
the cue cards. Silly, eh! You DO get to the slides EITHER by double
clicking on the 1 on the left of the untitled (Outline)
window…
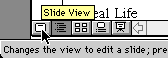
…OR by clicking the little Slide View icon at the
bottom left of the screen:
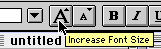
2. Play with the text on this slide. Change color, font size and
so on using the font part of the tools bar:
Selecting a whole piece of text to change it is tricky: you have
to click on it, then click again on the edge:

3. Unbelievably, the text isn't properly centered in the vertical
direction in this slide! Select everything with
control/command-A, then click on any item and drag upwards. If
you press the shift key as well, you will be able to drag only
vertically or horizontally. (This very useful tip applies to most
drawing packages.)
4. I don't like the look of this slide (i.e. the template). Let's
choose another. The Cue Cards tell you how. Go to the
PowerPoint Cue Cards window and click on Choose another
look for the presentation. The Presentation Template…
under the Format menu is the better option, but Pick a Look
Wizard… is OK too.
5. Bludiags (blue diagonals) is OK. Select it…

…but let's get rid of the silly diagonals. (You'll learn that
less is more when you want to get your message across.) Under
the View menu, choose Edit Master, and Slide
Master.
6. You can alter fonts, colors, bullets etc. on the Master, and
the changes will affect all slides. But how do we get rid of those
silly diagonal lines? Select them only by clicking at the bottom-most
part of the diagonals:
Now hit the delete key.
7. Play around with the Slide Background (under the
Format menu). With the Master slide in view, any change here
affect all slides. With any other slide in view, it affects only that
slide.
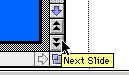
8. Now click on Slide View again. Click your way through
the slides with the double-diamond icons on the bottom right of the
slide window:
9. Alter text, create new slides and so on. But note that all the
icons between Insert Microsoft Word Table and Insert Clip
Art do not work at the time or writing.
10. Better Save your presentation at this point! And
don' t forget to keep saving it, just in case!
TRANSITIONS AND BUILDS
0. This is where we learn how to make cool transitions from
one slide to the next, and how to build (add) bulleted main
points on a slide.
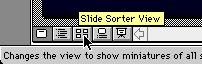
1. Click on the Slide Sorter View icon at lower left.
2. In the window that opens, click on the icon of a slide to
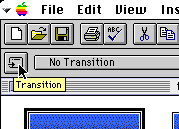
select it. To add a transition leading into (not out of) that
slide, click on the transition button at the top left of the tool
bar.
In the window that opens you can see what the different
transitions look like. When you know what you are doing, you can
select a transition directly from the long rectangle next to the
transition button. Alas, that brilliant starry transition you saw in
the Quick Preview is not available!
4. When you've added the transition, you get an extra little icon
at the bottom left of each slide's icon in Slide Sorter View window.
Clicking on it will show you the transition.
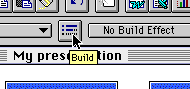
5. To add the Build effect to a slide, click on the slide
again, then click on the Build button in the middle of the
tool bar.
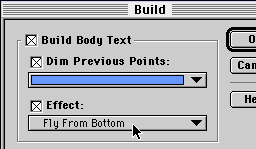
Make your choices in the window that opens:
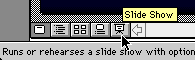
6. Now click on the Slide Show icon at the bottom of the
window:
Voila! Your title slide fills the screen. Move forward by clicking
the mouse or hitting the down-arrow or right arrow on the keyboard.
Move backward by hitting the left or up-arrow. When you get to the
slides with build effects, each click of the mouse or arrow key adds
the next point.
7. Click on the icon at the bottom right of the screen for a "pen"
that allows you to draw on the screen: useful when you show the
presentation to an audience.
8. To get out of the slide show before it finishes, hit the
escape key.
MISCELLANEOUS
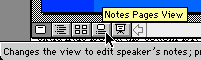
1. Notes Pages View opens a window for a document
consisting of one page per slide, with room to type notes under each.
You're unlikely to use this.
2. You can Print the slides, the outline, the notes, or a
handout consisting of several slides per page. Make sure you check
Page Setup… under the File menu first.
3. For real slides, go to Slide Setup…under the
File menu and select 35 mm Slides before you
create them: if you do it after, everything gets distorted. Note that
you cannot mix portrait and landscape formats. Most slides should be
landscape, but if you want the occasional portrait, you'll have to
create a new document.
4. There's heaps of other stuff. Best way to find out is to try
it!
resources=AT=sportsci.org
·
webmaster=AT=sportsci.org
·
Homepage
·
Copyright
©1997
Last updated 25 April 97